The Disk is Write-Protected: How to Remove Write Protection in Windows
If you’ve tried to format a USB drive, SD card, or an external hard disk only to be met with the message “The disk is write-protected”, you know how frustrating it can be. Write protection prevents data modification on a drive, including deleting files, copying new data to the drive, or formatting it.
Fortunately, Windows offers several tools that can help you fix this issue, although it’s important to understand that Disk Management alone cannot remove write protection.
In this guide, we’ll cover multiple effective ways to remove write protection, focusing primarily on DiskPart and the Windows Registry. We’ll also explain the limitations of Disk Management in handling this issue and provide helpful tips for when you’re dealing with external storage devices.
Read more >>> Introduction to Artificial Intelligence (AI): What Every Developer Should Know
What Is Write Protection?
Write protection (also known as read-only mode) is a setting that prevents data from being changed or deleted from a storage device. It’s commonly used to prevent accidental file deletion or to safeguard data from malware or viruses. While useful in some scenarios, write protection can be a nuisance when you need to reformat or reuse a drive.
Write protection can be:
- Software-based (set by Windows or other applications)
- Hardware-based (activated by a physical switch on the device)
Let’s now explore how you can resolve this issue using Windows tools.
Why Disk Management Alone Won’t Work
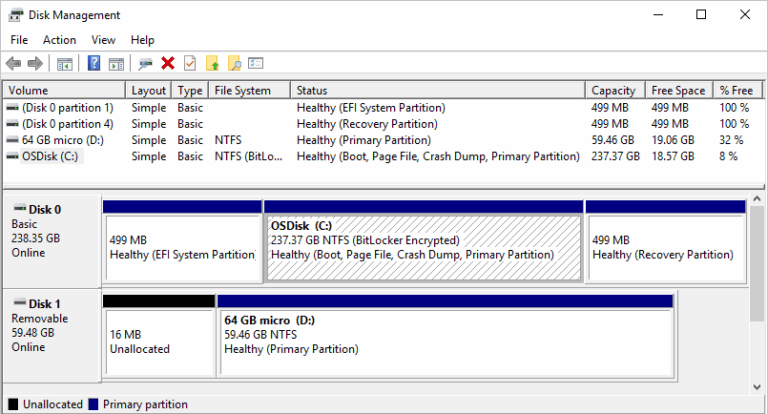
Disk Management, a built-in utility in Windows, allows users to format, create, and delete disk partitions. While it is user-friendly and accessible, it doesn’t have the functionality to remove write protection directly. If a disk is marked as read-only, all formatting and other options in Disk Management will be grayed out or result in error messages.

To remove write protection, you’ll need to use more advanced tools like DiskPart and Registry Editor.
Method 1: Remove Write Protection Using DiskPart
DiskPart is a powerful command-line tool that can manage disk partitions and attributes at a deeper level than Disk Management. Here’s how to use it to remove write protection:
Step-by-Step Instructions:
1. Open Command Prompt as Administrator
- Press
Windows + Rto open the Run dialog. - Type
cmd, then pressCtrl + Shift + Enterto run as an administrator. - Or search on Windows > CMD > Right-click > Run as administrator
2. Launch DiskPart
Once the Command Prompt is open, type:
diskpartThis launches the DiskPart tool.
3. List All Disks
To see a list of all disks connected to your system, type:
list diskYou’ll see something like:
Disk 0    Online      476 GB
Disk 1    Online       32 GB
Identify the correct disk by its size.
4. Select the Disk
Type the following command, replacing # with your disk number:
select disk #For example:
select disk 1You will receive a confirmation message:
“Disk 1 is now the selected disk.”
5. Check the Disk Attributes
To check if the disk is write-protected, enter:
attributes diskLook for:
Current Read-only State: Yes
Read-only: Yes
6. Clear Write Protection
Now, remove the write protection by typing:
attributes disk clear readonlyDiskPart should respond:
“Disk attributes cleared successfully.”
7. Exit DiskPart
Type:
exitYou can now try formatting the drive or copying files again.
Check this >>> How to Delete a Blank Page in Word
Method 2: Use the Registry Editor (For USB Devices)
If DiskPart doesn’t work or you’re working with a USB drive or SD card, try editing the Windows Registry.
⚠️ Caution: Incorrectly modifying the registry can cause serious system issues. Always proceed carefully.
Step-by-Step Instructions:
1. Open Registry Editor
- Press
Windows + R, typeregeditPress Enter.
2. Navigate to StorageDevicePolicies
Go to:
HKEY_LOCAL_MACHINE\SYSTEM\CurrentControlSet\Control\StorageDevicePolicies3. Modify or Create WriteProtect
- If you see a
WriteProtectentry on the right, double-click it, and set its value to0. - If you don’t see it:
- Right-click on
Control> New > Key, name itStorageDevicePolicies. - Inside that new key, right-click on the right panel > New > DWORD (32-bit) Value.
- Name it
WriteProtect, then double-click it and set the value to0.
- Right-click on
4. Restart Your PC
The changes won’t take effect until you restart.
After restarting, check if the drive is now writable.
Method 3: Physical Switch on the Device
Some SD cards and USB flash drives come with a physical write protection switch. If your device has one, make sure it is set to the “unlocked” or “write” position.
To do this:
- Eject the device.
- Check the sides for a small switch.
- Slide it in the opposite direction (usually marked with a padlock or arrows).
- Re-insert the drive and check again.
Method 4: Format the Disk (After Removing Write Protection)
Once you’ve removed the write protection, you can format the disk using Disk Management:
Steps:
- Press
Windows + Xand choose Disk Management. - Locate the affected drive.
- Right-click and select Format.
- Choose the file system (e.g., FAT32 or NTFS), assign a volume label, and click OK.
Make sure you back up any important data first, as formatting erases everything on the disk.
What If Nothing Works?
If all the above methods fail:
- Your disk may be corrupted or physically damaged.
- The drive’s firmware may be locked in read-only mode due to errors or wear.
In that case:
- Try third-party formatting tools like HP USB Disk Storage Format Tool or EaseUS Partition Master.
- Consider replacing the device.
Final Tips
- Always eject drives safely to avoid write protection errors.
- Use antivirus software to ensure malware isn’t locking the drive.
- Avoid cheap or unknown-brand USB sticks and SD cards, which are more prone to errors.
Read more >>> How to Create a Python File in VS Code
Conclusion
While Disk Management is a handy tool in Windows, it cannot remove write protection on its own. To effectively remove write protection, use DiskPart to clear disk attributes or use the Registry Editor for USB and SD cards. Don’t forget to check for hardware switches and consider replacing a drive if all else fails.
By following these steps to remove the disk is write-protected, you should be able to regain full control over your storage device — whether you’re trying to reformat it, copy files, or simply make it usable again.


